Coachmen Leprechaun

The restoration


bertie
Love's the Craic
Avatar
Gender:
Age: 43
Posts: 150
Registered: 02 / 2015
My Motorhome: Swift Kontiki 640
Base Vehicle: Fiat Ducato
Subject:

Re: Coachmen Leprechaun

 · 
Posted: 30.04.2018  ·  #521
:-/ :-/ Usually when those type of noises eminate from motorhomes,the owner has a large grin on their face. This is a first :P


Blag
Eat's Sleep's craic
Avatar
Gender:
Location: Co. Cork
Age: 54
Posts: 2525
Registered: 08 / 2012
My Motorhome: 1980 Coachmen Leprechaun
Base Vehicle: GMC G35 Vandura. 6.7 Litre Chevy V8
Subject:

Re: Coachmen Leprechaun

 · 
Posted: 02.05.2018  ·  #522
I'm glad I changed over to Rockwool. Much easier to fit this stuff. Lesson learned! I did about half of the ceiling last night. And no squeaks! :lol:

I should easily get the rest of it done tonight.


The rigid Kingspan foam has now been repurposed into a temporary work bench for cutting rockwool. :lol:


I also did a bit with the sockets in the galley. Fitting some back boxes and filling in lots of holes on the walls. My dad had fitted a brass double socket where the old 110v US socket used to be, but it never really fitted right. And you could still see the original hole in the wall where the recess for the 110v socket was a bit taller. So I glued & pinned some 10mm plywood reinforcing behind the wall and fibre-glassed the front. Not sure what the round holes were for (to the right), but I filled those up too. When sanded and wallpapered you'll never know the walls were peppered with holes!

I'll fit a double 230v socket on the bottom and a 'blank double plate' on top where I'll eventually fit 12v & tv stuff.


Blag
Eat's Sleep's craic
Avatar
Gender:
Location: Co. Cork
Age: 54
Posts: 2525
Registered: 08 / 2012
My Motorhome: 1980 Coachmen Leprechaun
Base Vehicle: GMC G35 Vandura. 6.7 Litre Chevy V8
Subject:

Re: Coachmen Leprechaun

 · 
Posted: 09.05.2018  ·  #523
We measured up the ceiling over the weekend. (And that was just about all that was done!)

With a wedding up in Co.Meath on Saturday, and an Ed Sheeran Concert in Cork on Sunday, I only had the Bank Holiday Monday for the usual domestic chores, leaving very little time for working on the camper. :-(

But at least we got the measuring done (thrice) and marked out the cut lines on the plywood. All that's left to do is cut out the panels and test fit them.

Once the fit is checked, we'll take them back down and stick on the vinyl ceiling paper that we got from a supplier in the UK. I may even paint the panels before putting them back up.


Blag
Eat's Sleep's craic
Avatar
Gender:
Location: Co. Cork
Age: 54
Posts: 2525
Registered: 08 / 2012
My Motorhome: 1980 Coachmen Leprechaun
Base Vehicle: GMC G35 Vandura. 6.7 Litre Chevy V8
Subject:

Re: Coachmen Leprechaun

 · 
Posted: 24.05.2018  ·  #524
Progress is slow (as usual) due to other commitments, but at least we now have a few sheets of ply fitted to the ceiling. It turned out to be a proper challenge to get the sheets up into place. There wasn't much room for maneuvering and with only a couple of millimeters of clearance, things were very tight getting the sheets up around the fixed cabinets. Some colourful swear words seemed to help them go into place. :D


Taking them back down and pre-fitting the textured vinyl covering will not be an option. I'm certain that we'd damage the vinyl if it was pre-fitted. So we'll be applying the vinyl directly to the ceiling as it stands now.
I fastened the sheets to the frame using some Soudal hi-tack adhesive and a pneumatic staple gun (5x25mm staples) so the sheets are not going anywhere now! I also fitted some stainless screws & cup-washers every 40cm². They're not necessary given the amount of glue & staples used, but I wanted to keep this original feature of the ceiling.

I have one more sheet to fit in the overcab bunk area tonight and then we'll be onto fitting the curved pieces where the ceiling meets the front & rear walls. With a bit of luck we'll get the vinyl covering fitted this coming weekend.


Blag
Eat's Sleep's craic
Avatar
Gender:
Location: Co. Cork
Age: 54
Posts: 2525
Registered: 08 / 2012
My Motorhome: 1980 Coachmen Leprechaun
Base Vehicle: GMC G35 Vandura. 6.7 Litre Chevy V8
Subject:

Re: Coachmen Leprechaun

 · 
Posted: 27.05.2018  ·  #525
I forgot to put some of these pics up last week.

Before fitting the plywood ceiling over the front bunk, I put some structural reinforcement into the overhead frame.

40 X 40 X 4mm aluminium U section bolted to the frame and braced with wooden ribs.


I still dont know if I'll go through with the what i have in mind, but at least the ceiling will now be strong enough for it if I do decide to go with it at some stage! :happy:

The Plan...

I've had this 2.5m linear slide/bearing for ages. I can't remember where I got it but you'd swear it was made for what I have in mind...


... suspending a TV from the ceiling. The TV would tuck in behind the bathroom wall when not in use and slide out front & center when needed. The privacy curtains for the bunk would hide it from general view from the side.


This is only a mock up. The slider and bearing carrier is solid, but the make-shift bracket is super wobbly and not the way it would be obviously. I have some 10mm aluminium plate that I would make into a cool looking swivel bracket.


Will I decide to fit it once the ceiling is finished? Right now I don't know... Now that it's mocked up and in place, it doesn't really do anything for me. The concept had been rattling around in my head for years and I had to get it out of the way. It looks cool and I like the practicality of it, but I don't know how often we'd use a big tv. I'm also not sure I like having the pair of slides running across the ceiling. Maybe I could hide them behind some sort of low profile pelmet or encase them in something less "industrial" looking...

The kids love it of course!

I have a 32" Sony TV that would fit nicely. (not 36" as written on the mockup). It's 6.5kg weight & 60watts (5 amps) max power consumption.


Whaddya think?
:-/


Blag
Eat's Sleep's craic
Avatar
Gender:
Location: Co. Cork
Age: 54
Posts: 2525
Registered: 08 / 2012
My Motorhome: 1980 Coachmen Leprechaun
Base Vehicle: GMC G35 Vandura. 6.7 Litre Chevy V8
Subject:

Re: Coachmen Leprechaun

 · 
Posted: 05.06.2018  ·  #526
For the raised ceiling over the front bunk, I used a 6mm 3 layer marine ply which was a bit more flexible than the 5 layer ply I used on the rest of the ceiling. This part of the job fought us every step of the way though. We couldn't maneuver a full 8x4 sheet around the corner of the toilet despite numerous try's. So I eventually had to cut the sheet in half. :-( I was trying to avoid doing this but I had no other choice. Hopefully it'll be fine. I've backed the join with a 3" batten that's glued & screwed to the rafters, and the whole sheet is glued, stapled 'n screwed to every rafter, so hopefully this join will be strong enough not to split later. I also put some filler on the join and a thin layer of fibreglass tissue on the visible side of the seam to make it as strong as possible! (Maybe a bit overkill I know. :lol: ) It shouldn't be too noticeable with the textured vinyl covering over it. Fingers crossed!


I also struggled with the curvy parts at the very front (and rear) of the ceiling where the ceiling transitions down to the wall. Regular 5 layer marine ply would not bend into the shape as it was way too rigid. I tried some 3 layer marine ply which was a bit more flexible but it still wouldn't bend into the shape I needed. I mentioned the problem to a friend of mine who is a carpenter. He suggested using something called long-grain "flexi-ply". I never heard of the stuff before. Sure enough it's a super flexible plywood, used in cabinet making. Also 6mm. It worked a treat. :-)


The ceiling over the rear foldaway bunk was a lot less troublesome!


A small removable panel will give access to the camera connections and the spare wires behind the rear wall.


Blag
Eat's Sleep's craic
Avatar
Gender:
Location: Co. Cork
Age: 54
Posts: 2525
Registered: 08 / 2012
My Motorhome: 1980 Coachmen Leprechaun
Base Vehicle: GMC G35 Vandura. 6.7 Litre Chevy V8
Subject:

Re: Coachmen Leprechaun

 · 
Posted: 11.06.2018  ·  #527
This weekend was all about getting that vinyl ceiling paper fitted. The process was a pain in the neck (literally :lol:), but I think the end result was worth it...

Ceiling prepped & ready for primer:


2 coats of primer and a light sanding later:


This was a family project with "all hands on deck" trying to get these 1350mm X 2400mm sheets of vinyl paper attached to the ceiling (not easy!):


The textured surface looks good. I had planned to paint it a very light shade of grey, but it looks fine as it is.


All that's left to do now is fit the trim pieces and the washer'ed stainless screws and it'll be another job off the list.

Now, back to the spannerin'... :-)

Edit: i wasn't sure what to do with the tv co-ax cable and the speaker wires on the back wall, so I just fitted a couple of rubber grommets on these blank wall plates and called this job done. The speakers are mounted underneath the shelf so I'll drop the wires down discretely when I get around to upgrading the rear speakers. The wires will be hidden behind a 3" mattress and probably a load of other junk so I don't care how these look. I doubt I'll ever use the coax cable, but at least it'll be there if I do...


oldautotrailer
Love's the Craic
Avatar
Gender:
Location: dublin
Age: 61
Posts: 194
Registered: 01 / 2015
My Motorhome: autohomes windfall
Base Vehicle: 1999 peugeot boxer 1.9td
Subject:

Re: Coachmen Leprechaun

 · 
Posted: 11.06.2018  ·  #528
thats a fabulous looking finish and a very neat job fair play to you, what adhesive did you use on the vinyl as a matter of interest?


Blag
Eat's Sleep's craic
Avatar
Gender:
Location: Co. Cork
Age: 54
Posts: 2525
Registered: 08 / 2012
My Motorhome: 1980 Coachmen Leprechaun
Base Vehicle: GMC G35 Vandura. 6.7 Litre Chevy V8
Subject:

Re: Coachmen Leprechaun

 · 
Posted: 11.06.2018  ·  #529
Quote by oldautotrailer

thats a fabulous looking finish and a very neat job fair play to you, what adhesive did you use on the vinyl as a matter of interest?


Thanks.

The supplier recommended using a heavy duty wallpaper paste with fungicide.

I used Solvite All Purpose "extra strong" paste.


JoeO'S
Love's the Craic
Avatar
Gender:
Location: Kildare
Posts: 149
Registered: 04 / 2016
My Motorhome: Hymer
Base Vehicle: Ducato
Subject:

Re: Coachmen Leprechaun

 · 
Posted: 11.06.2018  ·  #530
Good job. That's one hell of a good result. Bravo!

Final Furlong in sight.


JJF
Eat's Sleep's craic
Avatar
Gender: n/a
Location: Donegal
Age: 56
Homepage: MotorhomeCraic.com
Posts: 5319
Registered: 10 / 2014
My Motorhome:
Base Vehicle:
Subject:

Re: Coachmen Leprechaun

 · 
Posted: 12.06.2018  ·  #531
Great job, looks so original.
Getting closer all the time, cant wait to see it.


Blag
Eat's Sleep's craic
Avatar
Gender:
Location: Co. Cork
Age: 54
Posts: 2525
Registered: 08 / 2012
My Motorhome: 1980 Coachmen Leprechaun
Base Vehicle: GMC G35 Vandura. 6.7 Litre Chevy V8
Subject:

Re: Coachmen Leprechaun

 · 
Posted: 12.06.2018  ·  #532
ALL of my interior lights use 25 watt 1156 bulbs which consume over 2 amps each. That's no bueno.

1156 bulb (aka BA15S):


So after a lot of experimenting with different alternatives, I settled on these 48SMD panels which are the best value and quality of lighting for my buck. For the grand sum of €1.12 each on eBay :-)

These are 5 watts and use around 0.4 amps each. That's good enough for me.

More arrived in the post yesterday. Here i'm just testing them all to make sure they work before leaving positive feedback for the seller...


Here's an old pic that I took years ago. I fitted 6 of them at the time for testing purposes. Nice quality of warm white light from them and brighter than the filament bulbs....


I've had 2 of these panels running on test 24/7 for over 12 months and they are still working fine. Granted the test samples are now about 20% dimmer, but you could expect that for relatively cheap LED's that have been running continuously for nearly 10k hours. My confidence is good with these.


Blag
Eat's Sleep's craic
Avatar
Gender:
Location: Co. Cork
Age: 54
Posts: 2525
Registered: 08 / 2012
My Motorhome: 1980 Coachmen Leprechaun
Base Vehicle: GMC G35 Vandura. 6.7 Litre Chevy V8
Subject:

Re: Coachmen Leprechaun

 · 
Posted: 15.06.2018  ·  #533
That looks a bit better than the old dated wallpaper! I'm looking forward to getting the overhead locker and repainted extractor hood back into place this weekend.


Blag
Eat's Sleep's craic
Avatar
Gender:
Location: Co. Cork
Age: 54
Posts: 2525
Registered: 08 / 2012
My Motorhome: 1980 Coachmen Leprechaun
Base Vehicle: GMC G35 Vandura. 6.7 Litre Chevy V8
Subject:

Re: Coachmen Leprechaun

 · 
Posted: 18.06.2018  ·  #534
I had to do something about that back wall and this was the weekend for it. I only had to replace one small section of the frame that had signs of rot. The rest of the frame was fine.

A few weeks ago I bought a sheet of 3mm walnut veneered ply to line the back wall, but I recently discovered that the inside of the wardrobe was lined with the same veneered ply as the back wall. So I swiped the walls from the wardrobe. :-) I'll use the new veneered ply to re-line the wardrobe. i don't care too much about the matching grain pattern or colour in there! :lol:

Before:


The colour & wood grain is bang on and I took my time trying to get the joins as good as possible, so I'm happy with it. I just need to make up a new shelf for the little cubby hole and fit a full width top shelf and that'll be another job ticked off the list.

After:


My son & I also sanded back the face frames on 3 of the overhead lockers and put them back into place. They were OK as they were (ish), but they had 38 years worth of scratches & dents on them and the varnish was a bit sun-faded so I decided to sand them back to bare wood. I'll re-stain them to match the rest of the cabinets later.


Blag
Eat's Sleep's craic
Avatar
Gender:
Location: Co. Cork
Age: 54
Posts: 2525
Registered: 08 / 2012
My Motorhome: 1980 Coachmen Leprechaun
Base Vehicle: GMC G35 Vandura. 6.7 Litre Chevy V8
Subject:

Re: Coachmen Leprechaun

 · 
Posted: 25.06.2018  ·  #535
Gotta love this weather!

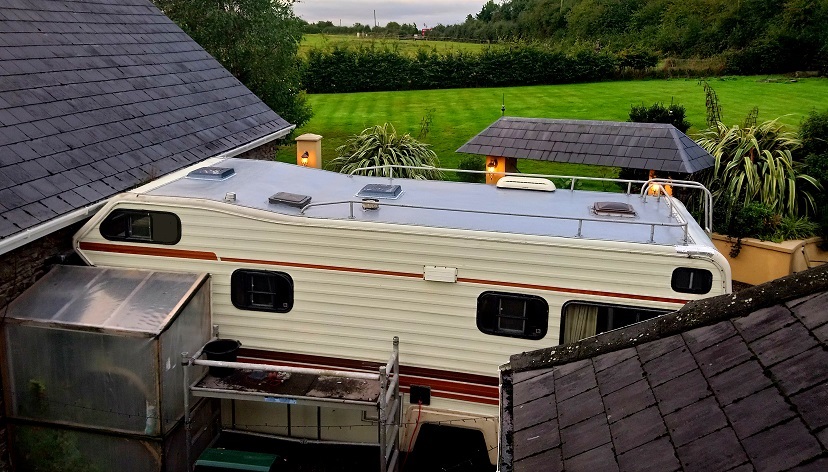
Seeing as the forecast is good for the next few days I figured it'd be a good time to work on the roof. I left my repairs too late in the season last year and the weather turned cold and wet before I could make a permanent job on the roof, so I only did a temporary job back then. This weekend was all about stripping back the patch jobs and making a proper fix up on top.

All of the roof lights and vents were fine. They were re-sealed last year. it was the rest of the roof that needed work, especially the roof trim..

It took a long time to scrape away the older silicone sealant that was there 10+ years, using a paint scraper and all of the patience that God gave to me... I was trying to completely remove all traces of silicone from the trim to ensure the new sealant and paint would bond properly. Lets say my Dad was very generous slapping on the silicone!

The aluminium roof skin is only 0.8mm thick so I had to be careful not to go too hard on it with any tools!
The job involved scraping 99% the silicone off with various scraper tools (which took most of Saturday), then wiping it all clean with acetone to remove what was left. Then a gentle scuff over the whole roof with a wirewheel, then another lash with 120 grit sandpaper on a random DA sander, then a blowdown with compressed air and then a final wipe down with panel cleaner...

Removing the trim around the perimeter of the roof was a pain. The heads on many of the Robertson screws were rusted badly so I had to grind down the top of a small vice-grips so I could clamp onto the stubborn screw heads and twist them out.


The roof trim should have had this vinyl insert covering the screws but it was long gone. Each screw a potential leak source, and there are hundreds! We had several leaks along the trim. So once I have the old aluminium trim fitted and the screws bedded in acrylic sealant, I'll get some of that vinyl insert and fit it. I'm sure I have a roll of it somewhere.


Something old something new :lol:


So all of that prep-work is done now and we're ready to reinstall the trim. Hopefully I'll get it back in place over the next evening or two. With a bit of luck, I'll get the roof fully painted & sealed by the end of the week using this flexible roof sealer that I got in B&Q last year:


The rest of the weekend was spent doing odd jobs.

The original dining table was made of chip-board. It got wet years ago and swelled up to the point it had become soft. So a new table was needed. I have a few big pieces of 18mm water-resistant MDF (Medite), so I'll use those for the new table. I wanted to re-use the formica from the old table so I searched youtube for a how-to guide on how to remove it. A guy showed a slick method of using acetone and an old kitchen knife... It worked very well. :-) A little bit scary though..


I also cleaned up the roof rails and got them ready to go back in place: (This pic tells me I need to do some weeding and some power washing next weekend :lol: )


I got another couple of sockets installed too. I'm way behind schedule with the electrical re-wiring. I got kinda bored of it...
Same as the sockets in the galley, the blank plate on top will eventually have a 12v power socket.


My son is on his summer holidays at the moment so he's "raising dust" inside in the camper with his electric sander. Sanding back the face-frames on all of the cabinets... Doing a great job too (proud dad).


Blag
Eat's Sleep's craic
Avatar
Gender:
Location: Co. Cork
Age: 54
Posts: 2525
Registered: 08 / 2012
My Motorhome: 1980 Coachmen Leprechaun
Base Vehicle: GMC G35 Vandura. 6.7 Litre Chevy V8
Subject:

Re: Coachmen Leprechaun

 · 
Posted: 17.07.2018  ·  #536
With the trim removed, I also decided to lift the edge of the aluminium roof skin and have a look underneath. I'm glad I did too. The Butyl sealing strip between the roof skin and the frame had signs of age-hardening and a few signs of minor water penetration, so while I was at it, I figured it'd be better to remove all of the butyl all the way around the roof and re-seal it with Polyurethane sealer. It wasn't too big of a deal, but it was time consuming.

Kinda like a can opener! :lol:


The wood frame below was fine, no rot. Here I used a few small wedges to keep the skin up off the frame for access. Removing the last traces of butyl with white spirits.


To re-seal the roof, I laid down two thick beads of sealer, one under the roof skin, and another underneath the aluminium trim strip (to seal the screw holes). I then dipped each screw in sealer before driving each screw home.
After I had that done, all that was left was to re install the rail. I used plenty of sealer under the pads. I went a bit heavy with the sealer which resulted in a good bit of excess squishing out, but I trimmed it all away from the pads & trim strip once it had cured.


The roof paint was pretty easy to apply. It had rubbery fibers in the mix so it took a while to get a technique 'down' to spread it out evenly with a paint brush. I was able to apply 2 coats from the one 5 litre can. Looking good up there now.
Its nice to know the roof is now 100% watertight. :-)

All that's left to do is fit the cover strip over the screws and give the quadrant edge panels a shot of beige paint to tidy things up.

For the last 2 weeks we took some holidays, so I didn't get near the camper. We had great timing for our "staycation" with the weather the way it was. It's a pity the camper wasn't road-ready this year, but hey-ho, there's always next year...


Blag
Eat's Sleep's craic
Avatar
Gender:
Location: Co. Cork
Age: 54
Posts: 2525
Registered: 08 / 2012
My Motorhome: 1980 Coachmen Leprechaun
Base Vehicle: GMC G35 Vandura. 6.7 Litre Chevy V8
Subject:

Re: Coachmen Leprechaun

 · 
Posted: 31.07.2018  ·  #537
I've hit a bit of a slump with the project (which seems to happen around this time every year), so you might notice the updates will come less frequently for a while. Probably every couple of weeks instead of every week. :sleep:

I've got a couple of projects around the house that need my attention so the camper is going to take second place for a while...

Having said that, there was feck all on telly last night so I decided to tackle this bad boy... :lol: It's been sitting on a shelf for the last few years waiting on some TLC.
I stripped it down and gave it a good oul cleaning. I need to de-rust the brackets and linkages too. Some parts will be zinc plated and some painted. I have a full rebuild kit for the carb with all new seals, float valve & seat and a full gasket set so we'll have a fighting chance of success when time comes to firing it up. :D

Rochester Quadrajet: https://en.wikipedia.org/wiki/Quadrajet


Chevy Andy
Craic'er
Avatar
Gender:
Location: Wicklow
Posts: 42
Registered: 07 / 2018
My Motorhome: Mallard Sprinter
Base Vehicle: Chevy P30
Subject:

Re: Coachmen Leprechaun

 · 
Posted: 31.07.2018  ·  #538
I have to say i am really impressed with all the work you have done, i thought i had it bad but you have done sone inspiring work on your van. Makes me feel kind of an amatuer with my chevy. Very interested to see your ongoing progress. Did you find a windscreen ?


Blag
Eat's Sleep's craic
Avatar
Gender:
Location: Co. Cork
Age: 54
Posts: 2525
Registered: 08 / 2012
My Motorhome: 1980 Coachmen Leprechaun
Base Vehicle: GMC G35 Vandura. 6.7 Litre Chevy V8
Subject:

Re: Coachmen Leprechaun

 · 
Posted: 31.07.2018  ·  #539
Quote by Chevy Andy

I have to say i am really impressed with all the work you have done, i thought i had it bad but you have done sone inspiring work on your van. Makes me feel kind of an amatuer with my chevy. Very interested to see your ongoing progress. Did you find a windscreen ?

Thanks! I broke the cardinal rule of restoration... Having a sentimental attachment to the vehicle!

But having said that, I really enjoy working on it. As disheartening as the project can get from time to time, it is fun and satisfying to solve the problems. It's really more of a hobby and I drift back and forth from it as I please. Probably to the frustration of some of the folks here that are following the thread... O-)

You are now welcome as part of the Motorhome craic "RV nutters club", one of the folks who roll up the sleeves and get stuck in. There's quite a few lads here that are motorhome DIY'ers and it's great when they share their projects with everyone. But the folks that work on the vintage campers really get my admiration and I'm biased towards american vehicles of course :-)

So I'm equally impressed with YOUR Chevy project and hope that YOU keep us up to date with your ongoing progress! Consider creating your own restoration blog if it interests you? I know in my case it helps me to keep a log of my own progress. Often reading back through a page or two helps to motivate me from time to time...

I'm OK for a windscreen at the moment. The original windscreen is in OK shape but I'm scared to death of it. If it breaks during installation then I'm a bit knackered. As a project rule, my plan all along was (and is) to spend the least amount of money as possible restoring our camper. Watching the pennies when buying parts & materials and doing most of the work myself, learning as I go. Breaking a windscreen could add significantly to the overall restoration cost. That's why I was very interested in seeing how you got on with sourcing something local for your Chevy. For now, my windscreen is tucked away in a quiet part of my shed wrapped up in blankets until the time comes to fit it!


Chevy Andy
Craic'er
Avatar
Gender:
Location: Wicklow
Posts: 42
Registered: 07 / 2018
My Motorhome: Mallard Sprinter
Base Vehicle: Chevy P30
Subject:

Re: Coachmen Leprechaun

 · 
Posted: 08.08.2018  ·  #540
Hi Kevin,
I found this link now, im a bit dim when it comes to using this site properly. Thanks for the encouragment - every little helps. Regarding the windscreen i have had some success, but nothing concrete yet. I am talking to a guy in the USA who is a chevy nut. He tells me he can get me a new windshield for $125 based on my Vin no. I am not 100% whether my windshield is a push or glue fit, but my US contact is pretty sure a 1991 is a glue fit. He is asking his father for advise as he has 30+ years of windshield replacement. Peter in Killarney (V8van) did find a windshield with classic glass in Germany but it is for a 85 model, and my US guy reckons it will not fit. Its all very confusing to be honest. I just want a windscreen and fittings - you think it would be easy.


Chevy Andy
Craic'er
Avatar
Gender:
Location: Wicklow
Posts: 42
Registered: 07 / 2018
My Motorhome: Mallard Sprinter
Base Vehicle: Chevy P30
Subject:

Re: Coachmen Leprechaun

 · 
Posted: 08.08.2018  ·  #541
I just read through your whole restoration blog and i have to say you are my new hero. My restoration attempt pales into insignificance - and that gearbox and engine assembly was magnificent. Think i will just go and shoot myself now 😆


CHAUSSON
Eat's Sleep's craic
Avatar
Gender:
Location: Tipperary
Posts: 6813
Registered: 02 / 2012
My Motorhome: Knaus Sport Ti 700 UFB Silverline
Base Vehicle: Renault Master 150 dci Quickshift
Subject:

Re: Coachmen Leprechaun

 · 
Posted: 09.08.2018  ·  #542
Quote by Chevy Andy

Think i will just go and shoot myself now 😆


O God don't, wait until he finishes it anyway :lol:


Ally
Founder
Avatar
Gender:
Location: Muckamore, Antrim
Age: 55
Homepage: motorhomecraic.com
Posts: 32600
Registered: 08 / 2011
My Motorhome: Lunar Roadstar 780
Base Vehicle: Fiat 2.8 JTD
Subject:

Re: Coachmen Leprechaun

 · 
Posted: 09.08.2018  ·  #543
Quote by Chevy Andy

Think i will just go and shoot myself now 😆


Can you list what are the best parts on yours first?

😇


Blag
Eat's Sleep's craic
Avatar
Gender:
Location: Co. Cork
Age: 54
Posts: 2525
Registered: 08 / 2012
My Motorhome: 1980 Coachmen Leprechaun
Base Vehicle: GMC G35 Vandura. 6.7 Litre Chevy V8
Subject:

Re: Coachmen Leprechaun

 · 
Posted: 09.08.2018  ·  #544
Quote by CHAUSSON
O God don't, wait until he finishes it anyway :lol:

:lol: :lol:


Blag
Eat's Sleep's craic
Avatar
Gender:
Location: Co. Cork
Age: 54
Posts: 2525
Registered: 08 / 2012
My Motorhome: 1980 Coachmen Leprechaun
Base Vehicle: GMC G35 Vandura. 6.7 Litre Chevy V8
Subject:

Re: Coachmen Leprechaun

 · 
Posted: 09.08.2018  ·  #545
I discovered a small leak in the front roof vent. When I went at it the cover practically fell apart. I guess the UV eventually got to the plastic.
I went searching on t'interweb for a replacement cover but the prices were pretty high and the choices were limited for the old style 14" vents. I could only find white solid plastic ones that don't let light through. This wouldn't suit me. I want to keep with the clear tinted ones for the extra bit of light.

So I found a supplier in Germany who sold these new style Fiamma 14" roof vents for less than €60 + modest delivery. Way cheaper than the local Irish suppliers unfortunately. (I'm all for supporting local suppliers, but where I can save money I will.)

Ordered on Friday, delivered today.


There's gotta be a way to mount a quiet DC motor and reasonably priced fan to this support beam. Seeing the screw holes on it gives me a few ideas to make some DIY vent fans and not pay over €200 for a Fiamma turbo vent or similar!


I'll eventually change all 4 vents, but for now I'll just replace the ones that are showing their age. It's a pity I didn't discover this issue last year when I removed & Resealed all of the roof vents! Typical fare with this project, one step forward & two steps back!

Ah well...


Blag
Eat's Sleep's craic
Avatar
Gender:
Location: Co. Cork
Age: 54
Posts: 2525
Registered: 08 / 2012
My Motorhome: 1980 Coachmen Leprechaun
Base Vehicle: GMC G35 Vandura. 6.7 Litre Chevy V8
Subject:

Re: Coachmen Leprechaun

 · 
Posted: 23.08.2018  ·  #546
This beastie wasn't looking it's best so I carefully cleaned up the rusty bits with Dremel wire-brushes and then did some zinc plating. (of course). :lol:


Stripped, cleaned and most of the bare metal parts now plated. Ready for reassembly.


I picked up a complete carburettor rebuild kit and a rebuild manual a long time ago. The manual is good, detailing how the Rochester carburettor works. It should make it easier to rebuild & tune it knowing what makes it tick!


Will have it back together and fitted to the engine this weekend with a bit of luck. :up:

Progress elsewhere on the camper has virtually stopped. Other projects needing more of my time. In a few weeks I should have those complete and then I can get back to wrenching on the Coachmen! :D


Ally
Founder
Avatar
Gender:
Location: Muckamore, Antrim
Age: 55
Homepage: motorhomecraic.com
Posts: 32600
Registered: 08 / 2011
My Motorhome: Lunar Roadstar 780
Base Vehicle: Fiat 2.8 JTD
Subject:

Re: Coachmen Leprechaun

 · 
Posted: 23.08.2018  ·  #547
Quote by Blag


Progress elsewhere on the camper has virtually stopped.


Vantastival19? O-)


Blag
Eat's Sleep's craic
Avatar
Gender:
Location: Co. Cork
Age: 54
Posts: 2525
Registered: 08 / 2012
My Motorhome: 1980 Coachmen Leprechaun
Base Vehicle: GMC G35 Vandura. 6.7 Litre Chevy V8
Subject:

Re: Coachmen Leprechaun

 · 
Posted: 23.08.2018  ·  #548
Quote by Ally

Vantastival19? O-)

:lol: God knows. I'll bet if I looked back through this thread, I'd see my answers to this kind of question with "maybe", "hopefully"...

Maybe I should be saying "fukt if I know lad"... :lol:


Ally
Founder
Avatar
Gender:
Location: Muckamore, Antrim
Age: 55
Homepage: motorhomecraic.com
Posts: 32600
Registered: 08 / 2011
My Motorhome: Lunar Roadstar 780
Base Vehicle: Fiat 2.8 JTD
Subject:

Re: Coachmen Leprechaun

 · 
Posted: 23.08.2018  ·  #549
O-)


Ally
Founder
Avatar
Gender:
Location: Muckamore, Antrim
Age: 55
Homepage: motorhomecraic.com
Posts: 32600
Registered: 08 / 2011
My Motorhome: Lunar Roadstar 780
Base Vehicle: Fiat 2.8 JTD
Subject:

Re: Coachmen Leprechaun

 · 
Posted: 04.09.2018  ·  #550
Sorry Kevin :(


Blag
Eat's Sleep's craic
Avatar
Gender:
Location: Co. Cork
Age: 54
Posts: 2525
Registered: 08 / 2012
My Motorhome: 1980 Coachmen Leprechaun
Base Vehicle: GMC G35 Vandura. 6.7 Litre Chevy V8
Subject:

Re: Coachmen Leprechaun

 · 
Posted: 04.09.2018  ·  #551
Could have been worse.

Well done getting the ship afloat again Ally...

>>>This date marks the time all photos were lost on the MHC host server<<<


thepilote
Love's the Craic
Avatar
Gender: n/a
Age: 67
Posts: 164
Registered: 10 / 2014
My Motorhome: PILOTE REFERENCE
Base Vehicle: DUCATO
Subject:

Re: Coachmen Leprechaun

 · 
Posted: 04.09.2018  ·  #552
Great its back,really missed it,.


Blag
Eat's Sleep's craic
Avatar
Gender:
Location: Co. Cork
Age: 54
Posts: 2525
Registered: 08 / 2012
My Motorhome: 1980 Coachmen Leprechaun
Base Vehicle: GMC G35 Vandura. 6.7 Litre Chevy V8
Subject:

Re: Coachmen Leprechaun

 · 
Posted: 12.09.2018  ·  #553
Carb reassembly:


It didn't give in without a fight though. I had two leaks that I had a hell of a time finding. I eventually sprung for a leak tester (€20 ebay) which made it possible to pressure test the various parts.


Solar.

I bought an Epever 30a MPPT controller a while back and I've been 'bench testing' it over the last few weeks. It's pretty fast at topping up a discharged battery and I'm very happy with it. The instructions are clear and the information viewable on the app is very good. Just enough info to keep my "inner nerd" happy. I may have made a mistake buying the add-on wifi module though. I should have bought the Bluetooth module instead. <lesson learned> The wifi module works fine, but it's a pain having to select it as my wifi source any time I want to use it. I think the Bluetooth unit would be a bit more user friendly. The bluetooth module is around €15 so I'll get one of those eventually.

I've decided to use MC4 connectors for all of the external connections and I'm going to use 16mm2 wires between the controller and the solar panels to minimise current loss AND because I have a spare roll of good quality 16mm2 wire sitting on a shelf in my shed! :D

I ordered some 30a MC4 connectors and splitters online (first time using aliexpress) and it took ages for them to arrive. Won't use that seller again!

For now, I'm only going to install the one 130w panel that MichelinMan (Will) gave to me a long time ago but I'll eventually get around to fitting some more up there. I went with a triple MC4 splitter for future needs. If the weather cooperates, I might get round to fitting the controller & Panel this coming weekend.


MC4 connectors


Info about the App and the comms module for anyone who is interested.


TAYLOR.
Eat's Sleep's craic
Avatar
Gender: n/a
Location: Galway
Homepage: kencarrolladaptati…
Posts: 3093
Registered: 12 / 2012
My Motorhome:
Base Vehicle:
Subject:

Re: Coachmen Leprechaun

 · 
Posted: 12.09.2018  ·  #554
Hi Kevin.

I had a problem with my panel eventually found the MC connector loose sorted now.


Blag
Eat's Sleep's craic
Avatar
Gender:
Location: Co. Cork
Age: 54
Posts: 2525
Registered: 08 / 2012
My Motorhome: 1980 Coachmen Leprechaun
Base Vehicle: GMC G35 Vandura. 6.7 Litre Chevy V8
Subject:

Re: Coachmen Leprechaun

 · 
Posted: 18.09.2018  ·  #555
i only got around to replacing the leaky roof vents on Sunday. (front & middle). Just in time too. We had a deluge of rain lastnight and it was perfect weather for leak testing.

Theres something very satisfying about checking for leaks, and finding none... :-)

I've ordered a third Fiamma vent to replace the one on the back of the camper. The new ones have a blue'ish tint whereas the old one at the back has a brown tint. the mismatch inside in the camper was messin with my OCD... :lol: I'll fit that when it arrives.

I'm not going to do anything with the fourth vent (over the loo) as it's got a 12v fan and it's not leaking & has no signs of age, so I won't mess with it. :-) (for now)

I had the same issue as you Ally, the newer 40cm vents are really for 39cm (15.5") openings not the old standard of 36cm (14") openings. Some careful trimming was required to make them fit our roof. It all worked out grand though.


Didn't get the solar panel fitted unfortunately.


Ally
Founder
Avatar
Gender:
Location: Muckamore, Antrim
Age: 55
Homepage: motorhomecraic.com
Posts: 32600
Registered: 08 / 2011
My Motorhome: Lunar Roadstar 780
Base Vehicle: Fiat 2.8 JTD
Subject:

Re: Coachmen Leprechaun

 · 
Posted: 18.09.2018  ·  #556
I know what you mean, I am now looking at my two older ones and wondering..... :)


hillton9
Eat's Sleep's craic
Avatar
Gender:
Location: Crossgar
Age: 67
Posts: 2909
Registered: 07 / 2013
My Motorhome: Rollerteam t-line 740
Base Vehicle: Fiat muiltijet
Subject:

Re: Coachmen Leprechaun

 · 
Posted: 21.09.2018  ·  #557
What a shame all past photos have been lost ,always enjoyed going back to look through them and catching up on what you have done ,hope you have save them all would be good to put them into an album ,just to remind you of how much you have put into this project


Blag
Eat's Sleep's craic
Avatar
Gender:
Location: Co. Cork
Age: 54
Posts: 2525
Registered: 08 / 2012
My Motorhome: 1980 Coachmen Leprechaun
Base Vehicle: GMC G35 Vandura. 6.7 Litre Chevy V8
Subject:

Re: Coachmen Leprechaun

 · 
Posted: 21.09.2018  ·  #558
Quote by hillton9

What a shame all past photos have been lost ,always enjoyed going back to look through them and catching up on what you have done ,hope you have save them all would be good to put them into an album ,just to remind you of how much you have put into this project
Yeah, I know. I should have most of the older ones, taken before Photobucket stopped their free 3rd party hosting. Unfortunately a lot of the newer photos were uploaded straight from my phone to the MHC host server, so most of those are gone. :-( I managed to recover some of them from my android phone by using an app called Dr.fone. There were photos that I had deleted but were still there amazingly, albeit a bit smaller and bad resolution, but I can still use some of them.

Some evening I'll grab a can of beer and start uploading what I have. The thought of it is a bit daunting though!!

Loosing the pics was a big loss to the site in general. My oul thread is only a drop in the ocean. I often poke back through other old threads and it's a bit frustrating when the pics are no longer there. Especially the blogs and great overnight parking spots or product reviews.


JJF
Eat's Sleep's craic
Avatar
Gender: n/a
Location: Donegal
Age: 56
Homepage: MotorhomeCraic.com
Posts: 5319
Registered: 10 / 2014
My Motorhome:
Base Vehicle:
Subject:

Re: Coachmen Leprechaun

 · 
Posted: 28.09.2018  ·  #559
Topic split from this forward at Kevins request.
New topic is ‘premium members chat’ under topic ‘Blag (Kevin) DIY, builds & more’.
If you want a different title for the split topic Kevin then let us know.
Quote by Blag
(Ally), is there any chance you could tidy this thread by moving every post after #559 into a new thread.


Blag
Eat's Sleep's craic
Avatar
Gender:
Location: Co. Cork
Age: 54
Posts: 2525
Registered: 08 / 2012
My Motorhome: 1980 Coachmen Leprechaun
Base Vehicle: GMC G35 Vandura. 6.7 Litre Chevy V8
Subject:

Re: Coachmen Leprechaun

 · 
Posted: 28.09.2018  ·  #560
Quote by JJF
Topic split from this forward at Kevins request.
New topic is ‘premium members chat’ under topic ‘Blag (Kevin) DIY, builds & more’.
If you want a different title for the split topic Kevin then let us know.
Quote by Blag
(Ally), is there any chance you could tidy this thread by moving every post after #559 into a new thread.


Thanks Jon,


Selected quotes for multi-quoting:   0

Registered users in this topic

Currently no registered users in this section

The statistic shows who was online during the last 5 minutes. Updated every 90 seconds.